TL;DR: Core Web Vitals measure your site’s speed, responsiveness, and visual stability—three things Google loves. In order to optimize them on WordPress, focus on image optimization, lightweight themes, caching, unnecessary plugins, CDN, and lazy loading. Not only do faster sites rank higher, but they also keep visitors engaged.
Time is of the essence in retaining visitors on your site, be it a blog, an E-commerce shop, or a service site. Google has realized this and introduced Core Web Vitals as one of its ranking factors. These metrics evaluate the loading speed, visual stability, and responsiveness of a website, offering an evidence-based way to measure user experience.
For WP site owners, it is essential to understand and optimize WordPress Core Web Vitals not just to improve your search engine ranking but also to maximize your conversion rates, reduce bounce rates, and engage better in general. This comprehensive guide explores what Core Web Vitals are, and how you can improve Core Web Vitals on WordPress sites. Let’s take a look.
What Are Core Web Vitals?
Core Web Vitals are a set of standardized metrics that Google introduced to evaluate the quality of user experience on the web. In contrast to the traditional metrics that focus entirely on overall page load time, Core Web Vitals are evaluated to measure how users perceive a website’s performance. Google underlines that it does not matter to the user when the page technically finishes loading, but rather when the major content is visible, stable, and interactive.
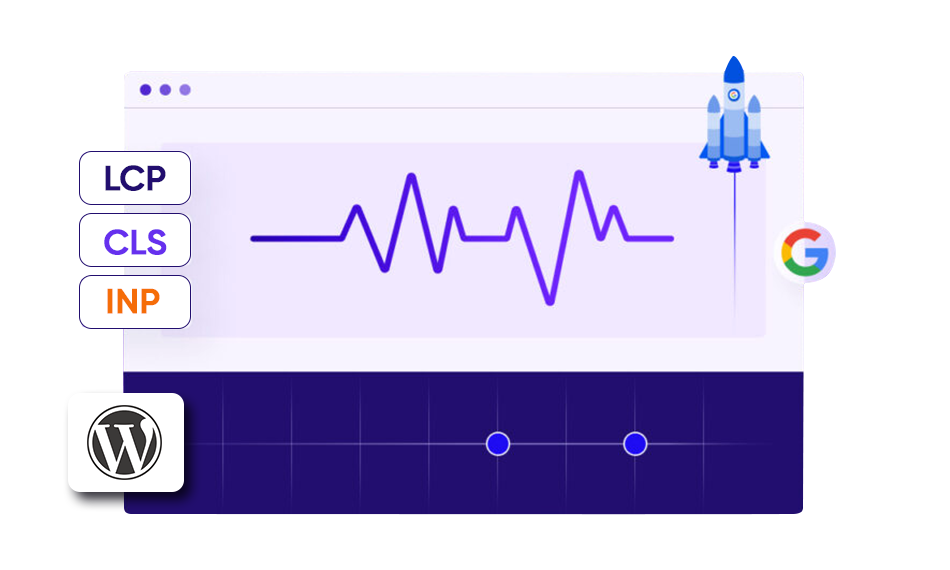
Currently, the three main Core Web Vitals metrics are:
- Largest Contentful Paint (LCP) – Measures loading performance.
- Cumulative Layout Shift (CLS) – Measures visual stability.
- Interaction to Next Paint (INP) – Measures responsiveness and interactivity.
These metrics are not merely technical figures, but are those that directly influence user experience. Users feel frustrated by a site with slow LCP, whose CLS is unstable, or has laggy INP. Additionally, Google is using Core Web Vitals as a ranking factor, which means that in order to gain higher positions in search results, WordPress websites now have no other option but to optimize them.
Why Core Web Vitals Matter for WordPress Sites
Core Web Vitals are essential to WordPress site owners for a number of reasons:
1. SEO and Search Rankings
Google uses these metrics in its Page Experience signals. Websites that have improved Core Web Vitals have a higher chance of ranking on top pages in the organic search, thus gaining more visibility and more traffic. Low scores, however, may lead to lower rankings regardless of the quality of the content being high
2. User Engagement
Visitors will be more inclined to stay on a site that loads fast, has visual stability, and provides instant response to interaction. A good user experience would result in longer session time, more page views, and conversions.
3. Conversion Rates and Revenue
E-commerce stores, membership sites, and lead-generation websites are quite sensitive to the performance of the page. Slow WordPress sites may lead to empty carts, loss of subscribers, and missed sales opportunities.
4. Brand Reputation
User experience contributes to how a brand is perceived. Sluggish, unstable, or unresponsive sites are detrimental to reputation, whereas fast and smooth experiences strengthen trust and encourage return visits.
Core Web Vitals Explained in Detail
In order to optimize the performance of your WordPress site, it is better to understand what the Core Web Vitals measure. Here are the three key metrics explained clearly:
Largest Contentful Paint (LCP)
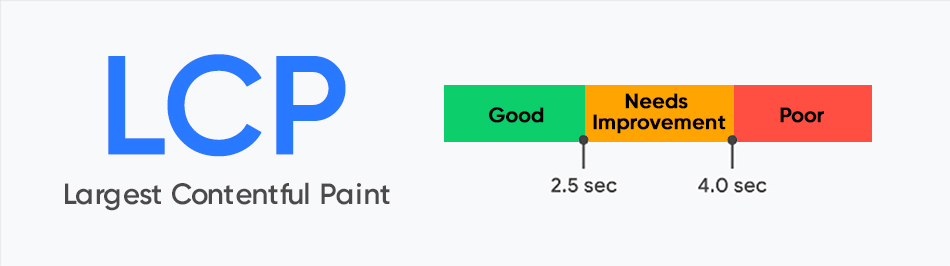
Largest Contentful Paint (LCP) is the metric that measures the time that the largest visible content element on a page takes to be loaded. This element is usually the hero image, a featured video, or a huge block of text somewhere at the top. In contrast to metrics that measure total page load time, LCP considers the element of the page that users perceive as most significant.
Why LCP Matters:
A page can be seen to be fast-loading when the primary content is accessible within a short time. Slow LCP may result in frustration, higher bounce rates, even if other parts of the page load later.
Google’s LCP Benchmarks:
| Good: | ≤ 2.5 seconds |
| Needs Improvement: | ≤ 4.0 seconds |
| Poor: | > 4.0 seconds |
How to Improve LCP on WordPress
To optimize LCP on WordPress sites, we need to have a blend of server-level optimization, front-end optimization, and smart content delivery. The following are the most useful strategies to improve your core web vitals on WordPress websites:
Enable caching
Page caching as well as browser caching should be implemented. It helps reduce the amount of time that the server would need to generate a page, while browser caching helps to make sure that returning visitors don’t need to load the same assets again and again.
This can be easily done with the help of WP plugins such as WP-Optimize or W3 Total Cache without any technical knowledge.
Optimize Images
One of the most prevalent reasons behind a slow WordPress LCP score is images. Reduce the size of large images without compromising their quality and use new and improved formats like WebP or AVIF to be served faster.
WordPress plugins like ShortPixel, Imagify can automate this process.
Minimize Render-Blocking Resources
CSS and JavaScript files tend to make the browser unable to render visible content on time. In order to improve WP core web vitals, ensure that the critical CSS (the styles needed for the above-the-fold content) is prioritized while non-essential scripts are deferred until the page has loaded.
CSS and JavaScript optimization can be automated with such tools as Autoptimize.
Use a Content Delivery Network (CDN)
A CDN ensures that your site’s assets are delivered from servers geographically closer to your visitors. This reduces latency, and your hero image or your main text block can be seen to appear significantly quicker.
Popular options include Cloudflare
Improve server response time (TTFB)
Time to First Byte (TTFB) reflects how long it takes your server to respond to a request. LCP is directly affected by a slow server response. It is also necessary to select a high-performance hosting provider with SSD storage, optimized caching, and compatibility with more recent protocols such as HTTP/2 or HTTP/3.
Managed WordPress hosting solutions such as Kinsta, WP Engine, or SiteGround are designed with performance in mind.
Lazy Load Non-Critical Media
Although LCP depends on the largest element shown in the viewport, loading unnecessary images or videos may slow down its rendering. With the lazy loading of media below the fold, you ensure that resources are allocated to the elements that are important to the users, i.e., elements first seen by the users.
Managed WordPress hosting solutions such as Kinsta, WP Engine, or SiteGround are designed with performance in mind.
Cumulative Layout Shift (CLS)
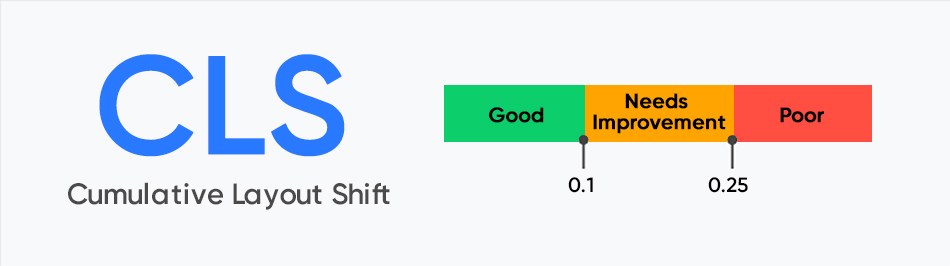
Cumulative Layout Shift (CLS) measures the degree of visual stability that a webpage can provide during the loading process. To put it in less complicated words, it tracks the rate and extent to which elements on a page shift unpredictably as a visitor attempts to read or interact with content.
Such changes typically occur due to the fact that resources like images, ads, or fonts are not loaded correctly or the available space is not allocated to them ahead of time.
Why CLS Matters:
When elements shift around unexpectedly, users may end up clicking the wrong button, lose their place while reading, or abandon the site altogether, and this damages both user experience and conversions.
Imagine a user browsing your food blog, carefully scrolling through a recipe. They click on the link for an ingredient, and the page, however, jumps and makes them click on an ad instead. This is not only frustrating, but it also betrays confidence in the browsing experience. Google is aware of this frustration and has made CLS an official ranking signal because poor stability is a sign of bad user experience.
Google’s CLS Benchmarks:
| Good: | ≤ 0.1 (minimal or no visible layout shift) |
| Needs Improvement: | Between 0.1 and 0.25 (noticeable but not critical shifts) |
| Poor: | > 0.25 (significant, disruptive layout instability) |
How to Improve CLS on WordPress
Improving CLS on WordPress sites requires a combination of technical fixes and smart design techniques that can ensure your layout is holding steady while delivering a seamless user experience.
Set Explicit Width and Height for Media
Reduce CLS on WordPress site by always defining fixed dimensions for images, videos, and iframes in your code. This ensures that browsers reserve the right amount of space on the page when loading, so that the other contents are not jumping around. Many themes and page builders already allow this, but double-check your site’s media settings and theme customization.
Reserve Space for Ads and Third-Party Embeds
Ads, social widgets, and third-party scripts are among the most common culprits of layout shifts. When running ads, predefine their sizes or implement CSS to make sure that there is sufficient space for the ads even before they are loaded. In this manner, once the ad renders itself, it will not force other content out of its way.
Preload Fonts or Use font-display: swap
Custom fonts may increase the time taken to render text, resulting in: flash of invisible text (FOIT) or sudden shifts when the fallback font switches to the intended one. To avoid this, preload fonts for critical content and use the font-display: swap property in your CSS. This will enable fallback fonts to be displayed immediately and ensure a smoother transition when the custom font loads.
Avoid Inserting Content Above Existing Elements
There could be disruptive shifts as a result of adding dynamic banners, pop-ups, or notification bars once the page starts to render. Load these elements below the existing content, apply overlays, or reserve a space so that the layout remains stable as elements appear.
Interaction to Next Paint (INP)
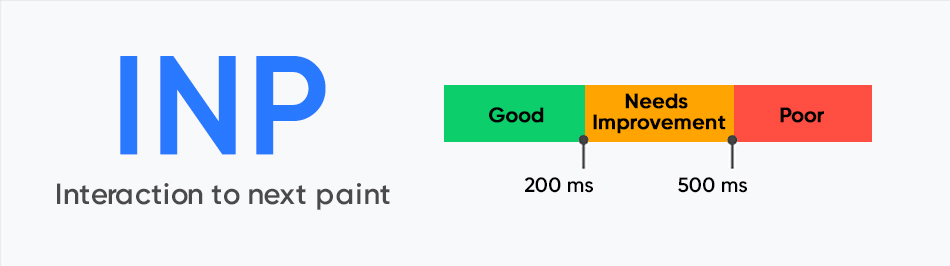
Interaction to Next Paint (INP) is a performance metric used to measure a webpage’s response rate to user interactions, e.g., clicks and key presses. It is viewed as a natural progression of First Input Delay (FID) that solely dealt with the initial user interaction.
INP, however, is more elaborate in giving a complete picture by evaluating responsiveness across the entire browsing session. This makes it a stronger indicator of how users experience your WordPress site in real-world conditions. If your site takes time to react to something, such as clicking the button or filling out a form, it can feel slow and untrustworthy, regardless of how fast it loads initially.
Why INP Matters:
Slow response will make users lose patience, causing them to give up forms, skip check out processes, or even leave your site entirely. Not only does this affect conversions, but also makes Google think that your site has a poor user experience.
With Core Web Vitals being now associated with search engine rankings, poor INP scores can reduce your visibility in search engines. AEO (Answer Engine Optimization) also values efficiency and usability, making responsiveness even more critical for appearing in voice and AI-driven search results.
Google’s CLS Benchmarks:
| Good: | ≤ 200 ms |
| Needs Improvement: | 200–500 ms |
| Poor: | > 500 ms |
How to Improve INP on WordPress
To improve Interaction to Next Paint (INP) on WordPress, it is important to make the site fast, responsive, and intuitive by reducing delays between user inputs and visual feedback.
Load Non-Critical Scripts Asynchronously
Use async or defer attributes to ensure that scripts don’t block rendering or delay user interactions.
Minimize JavaScript Execution
Heavy JavaScript can slow down the main thread, delaying response. Audit unnecessary scripts and remove the ones you do not need. For essential scripts, defer loading until after the page is interactive.
Optimize CSS and Images
Large CSS files or unoptimized images increase browser workload. CSS can be minified to eliminate unnecessary characters and images can be compressed into the most efficient formats such as WebP or AVIF.
Free Tools to Measure Core Web Vitals on WordPress
Accurate measurement is the foundation of any successful optimization effort. Without clear data, WordPress Core Web Vitals optimization is guesswork. Luckily, Google and the entire web community offer a few easy-to-use tools to test, track, and monitor these metrics. Each tool has varying purposes, from one-page analysis to site-wide reporting.
1. Google PageSpeed Insights
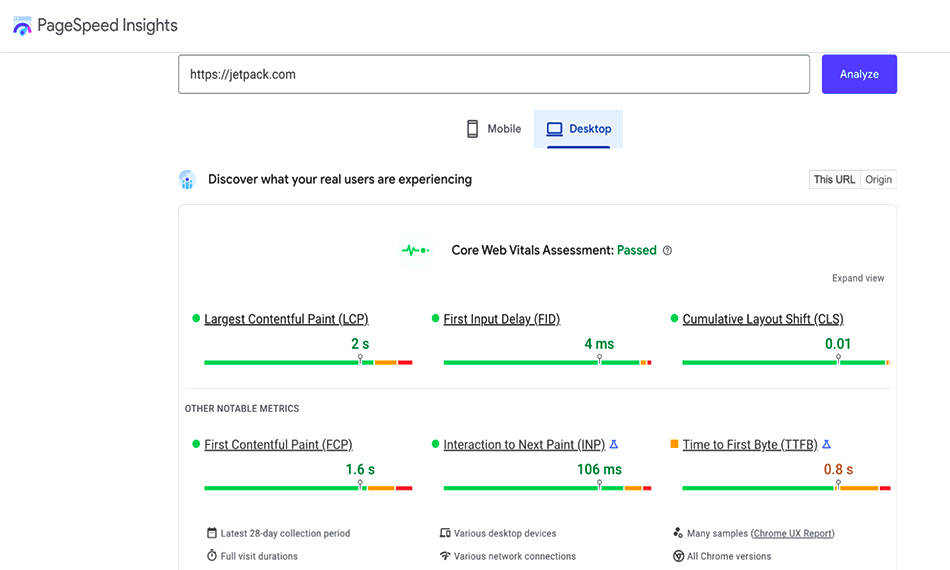
Most site owners usually start with this. PageSpeed Insights is a Google created tool that gives you a lot of information regarding your website’s performance and even your Core Web Vitals. Upon entering a URL, a detailed breakdown of the page’s performance on both mobile and desktop is displayed.
You will find at the very top, your WP site Core Web Vitals, with LCP, FID and CLS scores. They are presented in a manner that you will instantly know whether your site is ready to go or needs clarification. You’ll also get related speed metrics not included in Core Web Vitals, such as Time to First Byte (TTFB), and Time to Interactive. To read more about each of them, you can click Expand View.
When you continue to scroll, you will get a list of the opportunities to improve Core Web Vitals for WordPress, which can be filtered depending on the insights that each suggestion applies to.
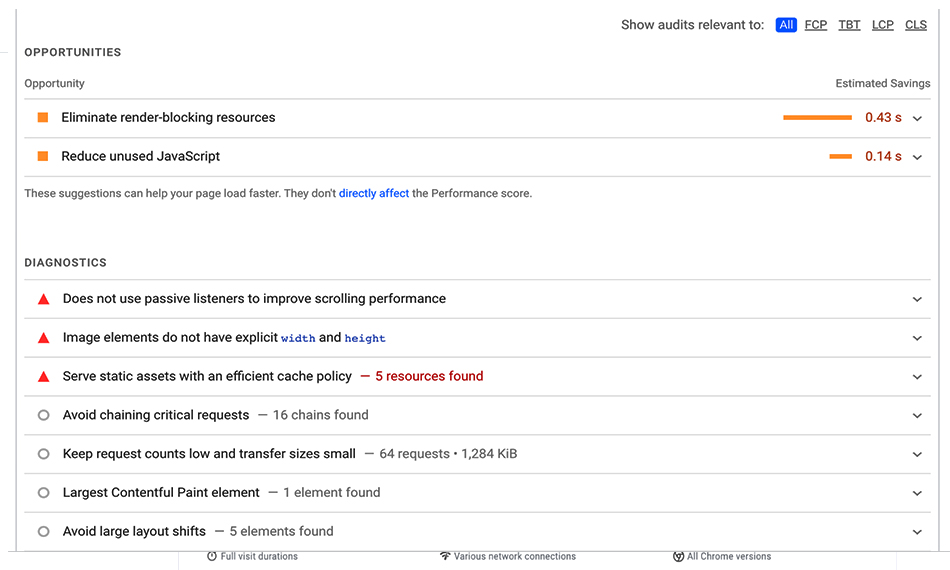
To view more details, click the arrow on the right of each one. Lastly, there is a list of Passed Audits at the bottom, all the things that your site is doing well.
2. Google Search Console
Another tool that is Google owned is Google Search Console. You can do much with this including submitting your sitemap as well as viewing and correcting indexing problems. And, since Core Web Vitals are related to SEO, there is a dedicated section to them
You will need to create a Google Search Console account in case you do not already have one. To start with, locate the Select Property dropdown and click Add Property. You will have two choices then:
- Domain:Covers all the URLs, such as those of HTTPS and HTTP, and the subdomains. This is the most exhaustive option and the most complex to configure setup as it involves editing your DNS records.
- URL prefix:This only addresses the URLs that belong to the domain name that you type in. Verification methods are also varied by this route.
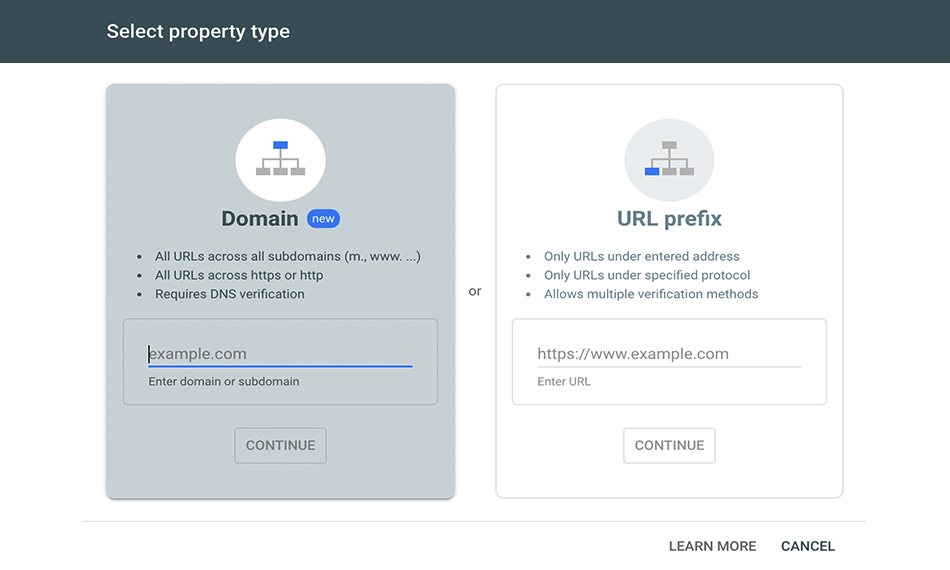
In this example, we are proceeding with the URL prefix technique. You are asked to enter your URL in the given box and Continue.
At this point, you’ll find several different verification options:
- HTML file: Download an HTML file and load it into your site using FTP or cPanel.
- HTML tag: Copy the meta tag offered and insert it in the part of the homepage of your site.
- Google Tag Manager: Use your existing Google Tag Manager account to verify your site.
- Google Analytics: Verify your site using your existing Google analytics account.
- Domain name provider: Edit your DNS records to link your site with Google
Select whatever approach suits you best – Google will give you further instructions on each one, and forge ahead. After verifying your site, you may then proceed to choose Core Web Vitals for WordPress in the left menu of Google Search console.
There you’ll find charts for both the mobile and desktop version of your site that will provide you with an overview of how it is performing.
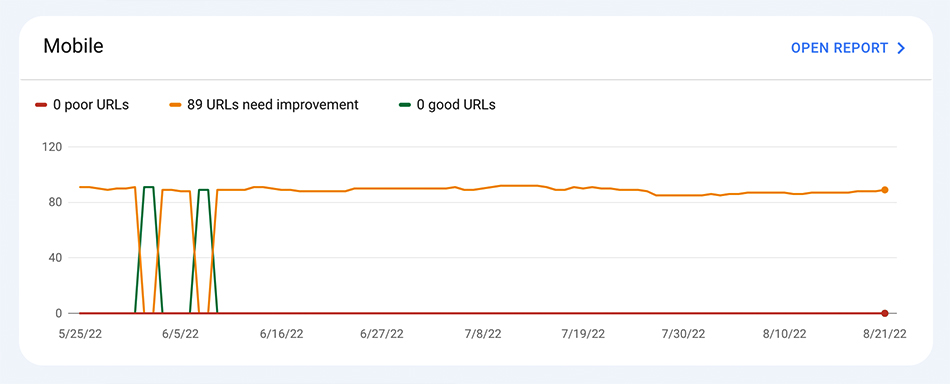
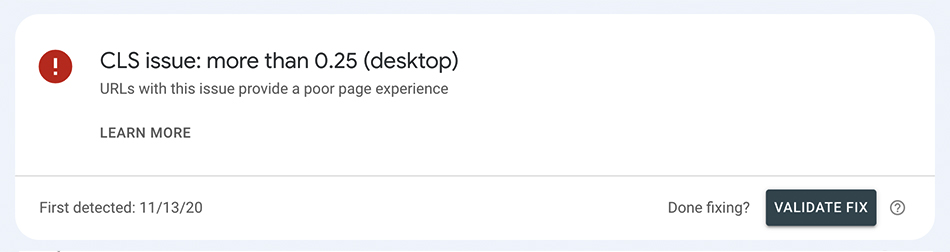
Click Open Report for more information. There, you would see the ranking of each of your URLs regarding Core Web Vitals. You may even revisit this page after having made some changes to resubmit the page to Google and validate your fixes.
3. Google Lighthouse
In contrast to GSC and PageSpeed Insights, which are more concerned to fix WordPress site Core Web Vitals, Google Lighthouse delves more deeply and examines accessibility, best practices and SEO on top of performance.
To generate reports in your browser, just right-click on a page and choose inspect. In the “Lighthouse” tab, you get the ability to select the metrics to be tested, the most applicable being performance in the case of Core Web Vitals.

This tool is especially useful for deeper technical audits, such as identifying render-blocking resources or inefficient JavaScript execution, which might not be as obvious in higher-level reports.
Conclusion
WordPress Core Web Vitals optimization is no longer a choice. These metrics are the pillars of the user experience, SEO performance and the general success of the website. Knowing about LCP, CLS, and INP, measuring them with the tools provided by Google, incorporating best practices in images, scripts, hosting, and server settings, WordPress site owners can achieve fast, stable, and responsive websites.
In 2025 and after, the emphasis on Core Web Vitals will be a key to the success of any WordPress site that is planning to remain competitive, to have higher ranking in Google, and to provide every visitor with high-quality experience.